Your Best Tools for Content Organization in WordPress

Hello! Before I get into today’s post, I want to introduce myself. My name is Hannah, and I joined the Web Content team in June. It’s been fun getting to know all the different departments and working with so many wonderful WordPress users to improve the website.
One of my new responsibilities here is teaching the technical portion of the WordPress 102 training session. So, if you’ve taken WordPress training recently, there’s a good chance we’ve already met.
Your Best Tools For Content Organization in WordPress
When you create a page in WordPress or add new information to an existing page, it’s important to make sure the content is organized in a way that is user-friendly and easy to read. This helps to create a seamless user experience for our readers.
Thankfully, WordPress has several great tools to help you organize content like a pro. I’m going to go over a few of my favorites and include step-by-step instructions you can follow.
(Note: The following screenshots and tutorials are from the classic editor. If your site has already switched to the Gutenberg editor, go check out our Welcome To The Gutenberg post for applicable information).
Accordion Tool
Some web pages require a lot of information that is intended for different types of users, such as students, professors, and parents. The accordion tool offers a great way to display lots of information in a dropdown format. When used strategically, the accordion tool can help readers skim a page and quickly find the content that’s relevant to their needs.
How to Use the Accordion Tool
- In the front end editor, select the Accordion tool
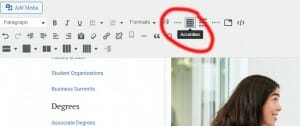
2. The tool will generate a title section and a content section, called an accordion item. Add the title and the content for the first item.

3. Click the Add Accordion Item button to add another item.
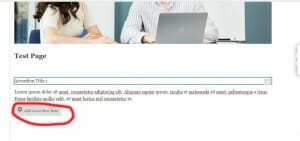
4. Repeat the process as many times as needed.
Note: The accordion tool looks and functions best when there are at least 3 dropdown items in the list. If there are only 1 or 2 options, bullet points or separate headings may be a better solution.
Accordion Tool Video Tutorial (0:00 – 1:18): https://www.youtube.com/watch?v=oEY49KzAE3E
Tab Tool
The tab tool can be another great way to organize information on a page. Similar to the dropdown feature in the accordion tool, the tab tool provides clickable tabs that display content. It can be used to organize information from different months or years, display photo galleries, and in many other ways too.
How to Use the Tab Tool
- In the front-end editor, select the tab tool
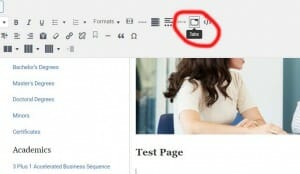
2. The tool will generate 3 title sections and 3 tab content sections. You can title the tabs and add content as needed. Remember that each content section is fully editable and customizable with any of the tools available in the toolbar.

3. To add a new tab, you can hover over the Tab Title section until you see a + sign appear. Click that to add extra tabs.
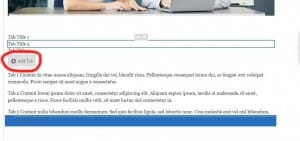
Note: Stick with 1- or 2-word labels for each tab. If the titles are much longer, they won’t be fully visible and will cause confusion for readers.
Tab Tool Video Tutorial (1:18-1:58): https://www.youtube.com/watch?v=oEY49KzAE3E
Column Tool
Columns are another versatile tool that WordPress offers. They can be used to organize and display all types of content, from faculty bios to photos. The toolbar offers several different column layouts so you can choose the layout that works best for your content needs.
How to Use the Column Tool
- In the front-end editor, select the column layout you want to use. You can choose either 2, 3, or 4 vertical columns.

2. The tool will generate either 2, 3, or 4 columns full of placeholder text. You can delete that text and add your own content. Remember that you can add images, headers, and bullet points as needed.

3. The paint tool is available in columns. It adds a background shade to the column which can help it stand out from the rest of the page. You can access this tool by hovering over a column until you see a mini toolbar pop up. Then, click on the paintbrush icon and choose either blue or grey for the background color.

Column Tool Video Tutorial: https://www.youtube.com/watch?v=8FOX5WVCzMI
Helpful Reminders
I also wanted to include several reminders that may be helpful as you set out to create or edit your pages and organize your content.
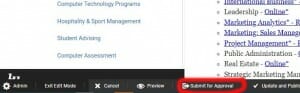
1. Front-End Editor
First, I want to remind you of the importance of using the front end editor. The front end editor allows any changes you make to be submitted to the appropriate people for approval.
How to Access the Front-End Editor:
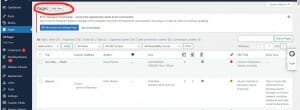
1. Log in to the back end of your website and go to your pages list.
2. Find the page that you need to edit and hover over the page title
3. Click the “view” button that appears
4. That will lead you to the live page with a small black edit bar at the bottom.
5. Click the “Enter Edit Mode” button at the bottom

6. Then click the “Edit Page” button to bring up the editing toolbar and make your edits.
7. Once you’ve finished your edits, click “Submit for Approval” to submit your edits to the appropriate editor.
2. Creating a Page
Creating a page is one of the few tasks you will complete in the back-end editor.
How to Create a Page:
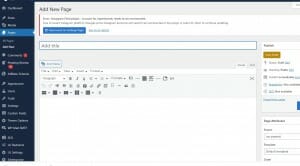
1. Log into the back-end editor and click on the pages option.
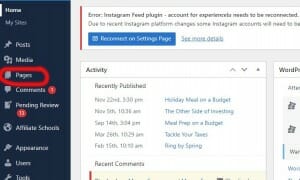
2. Then, look for the “Add New” button at the top of the pages list, and click on it. This will create a brand new page.
3. Fill in the Title field with the page title you’ve chosen (make sure to name it whatever the published page title will be, as this field can’t be easily changed later).
4. Once you’re ready, you’ll click the blue button that either says “publish” or “submit for review”.
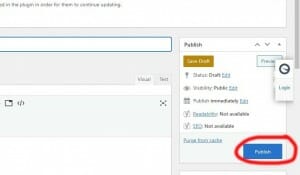
5. If you are an editor, you are able to publish the page and this is the final step. Simply follow the steps in the above section to access the front-end editor to make the rest of your edits. If you’re a contributor, you won’t have the ability to publish. Instead, your blue button will say “Submit for review”. In this case, you will need to take one extra step. You will need to send an email to webcontent@liberty.edu and let our team know about the new page.
Creating a Page Video Tutorial: https://www.youtube.com/watch?v=ZNwp7TWTZxs
3. Watch Out For Outlook Safe Links
When you add a link to your webpage, it’s important to make sure that you copy the links directly from the URL bar on the page. It can be tempting to copy a link directly from an email, but due to advanced security measures in Outlook, our team discourages this.
This is because Outlook automatically checks all of the links and adds an invisible tag to the URL. If you copy the URL directly from the email, this tag will be included.
To avoid this, you can simply click the link first and wait for the page to load. Then, copy the URL from the address bar and paste it onto your page.
We Are Here To Help!
Creating new pages and organizing content is a big job and sometimes WordPress tools can be tricky to navigate. If you have questions, or get stuck at any point in the process, the Web Content Team is here to help you.
We are a remote team but we are always available by email or Microsoft Teams Chat. Please don’t hesitate to reach out to any of us with any questions you may have!
Additional Resources
https://www.liberty.edu/web-services/wordpress/tutorials/ – Our WordPress video tutorials are a great resource if you need a refresher on page editing or best practices.
https://www.liberty.edu/web-services/blog/3-tips-for-becoming-a-wordpress-pro/ – This blog post has more tips to help you create pages like a WordPress pro.
https://www.liberty.edu/web-services/blog/new-wordpress-tools-please-enjoy-responsibly/ – Read this post for an explanation of several other helpful WordPress tools.
Meet the Author
Hannah Brown
Web Content Associate – LU Web Content Team