WordPress Manual
Introduction
WordPress is the CMS (Content Management System) tool used by Liberty University to create and edit website content for all university-designed and hosted websites. Access to WordPress is both a privilege and a responsibility.
Users must obtain proper rights and permissions in order to access WordPress. Contact the Web Content Team at webcontent@liberty.edu to complete the required training and be granted access to your site.
Contents of This Manual
Access and Expectations
Prior to initial use, prospective user must complete WordPress 101 Training on Canvas and attend a virtual training session. As a new user, you will need to contact the Web Content Team (webcontent@liberty.edu) when you are ready to sign up for a WordPress 102 Training Session.
Access to WordPress is granted to university employees, and occasionally to students. Students may not serve as Editors. Sharing your access privileges with someone else is prohibited. If someone in your department needs access, please email your request to the Web Content Team.
Expectations of all WordPress Users:
- View the required online WordPress training course.
- Follow direct instructions from the Web Content office regarding content.
- Review and follow any posted guidelines or instructions found on the Web Services blog.
- Regularly review all department web content to make sure it is current and accurate.
- Keep the Media Library organized – ask Web Content for help deleting files that are no longer in use.
- Properly edit and format all content and files for upload.
- Comply with the university Web Policy.
User Access Levels
WordPress has different access levels allowing users to perform appropriate tasks.
Each department can have up to five Contributors – at least one of which must be a full-time employee. Editor access is granted to one full-time employee per non-academic web department. Departments seeking an exception must receive approval from the Web Content manager.
See below for a description of each role in WordPress and know what your access and responsibilities on the web include.
Subscriber
- No site access or privileges. When users first login to their site, they will be shown on the user list as a Subscriber.
Contributor
- Make edits to pages using Front-End Editor
- Including text, images, links, buttons, accordions, etc.
- Create new pages
- Submit pages for approval to have them made live
- Non-academic departments: pages are approved by the Editor for the department
- Academic departments: pages are approved by the Web Content Team and Institutional Effectiveness
Editor
- Make edits to pages
- Including text, images, links, buttons, accordions, etc.
- Create new pages
- Delete pages
- Approve pages to make them live on the web
- Ensure that all content in the department is up-to-date
- Review changes made by Contributors before publishing pages
- Serve as a point of contact for the Web Content Team
- Manage user list of the department
Administrator
- Admin rights to all pages and features of WordPress are restricted to IT personnel that provide website template design, website editing, software development, network maintenance, or university-level content maintenance.
Classic Editor Toolbar
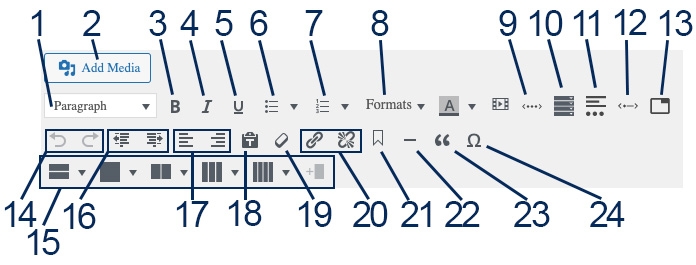
- Text Styling: Paragraph and heading formatting styles.
- Add Media: Insert file from Media Library or upload new file.
- Bold Text
- Italicize Text
- Underline Text (use rarely – underlined text can be perceived as a link).
- Bulleted List
- Numbered List
- Button Formatting Options: Primary, secondary, tertiary.
- Carousel: Slideshow of text and/or images.
- Accordion: Add dropdown sections.
- Read More: Insert “Read More” link to show additional content.
- Slider
- Tabs: Display content in section with tabbed navigation.
- Undo/Redo
- Section: Full width, columns (50/50, 33/33/33, 25/25/25/25), add column
- Decrease and increase indent
- Left and Right Aligned Text
- Clear Formatting
- Insert/edit Link and Remove Link
- Insert Anchor: Create anchor ID to link to
- Horizontal Line
- Block Quote
- Special Character
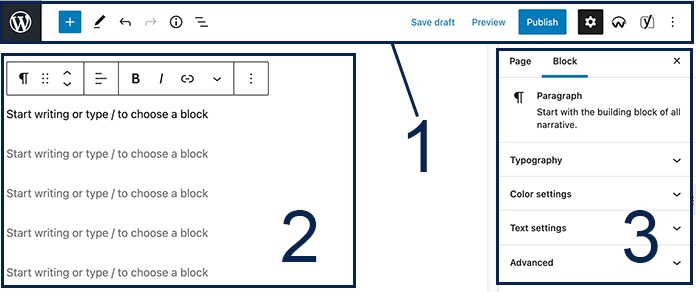
Gutenberg Block Editor
The Block Editor is made up of three main areas:
- Top Menu
- Content Area and Block Toolbar
- Sidebar Menu
See WordPress.com Support for additional help on the WordPress Editor: Working With Blocks.
Top Menu
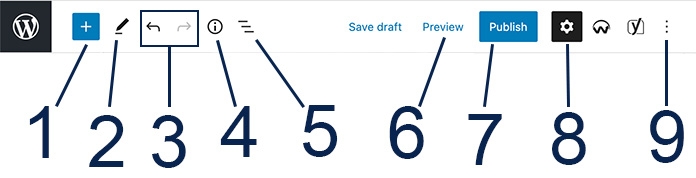
- Block Inserter: Browse all of the available blocks, block patterns, and reusable blocks.
- Tools: Choose between editing a block and selecting a block.
- Undo and Redo: Undo an action or redo an undone action.
- Details: View the number of characters, words, headings, paragraphs, and blocks used on the page.
- List View: See a list of all of the blocks that are on the page.
- Preview: See what your page/post looks like. Preview edits before saving or publishing a page.
- Publish or Update: Publish a new page/post or update to save changes to an already published page/post.
- Settings: Open/Close the sidebar menu to see page and block settings.
- Options: Opens View options, Editor style, and additional tools.
Content Area and Block Toolbar
This is the main section of the editor. Here is where you set up your page and add blocks of content. There are many types of blocks to choose from, which are organized by categories – Text, Media, Design, etc.
When a block is selected, a block-specific toolbar will appear. The buttons in the toolbar change depending on the block you are editing.
There is no front-end editor with the Block Editor version of WordPress. You will work within the content area to create your page and add content. The content area displays your page very similarly to how it looks on the front end to site visitors.
You can drag and drop blocks of content using the six dots icon in the toolbar. The up and down arrows can be used to shift a block’s placement up or down on the page.
The three dots at the end of the block toolbar open additional options. These options are available for most block types.
- Show/Hide More Settings: Opens and closes the settings sidebar menu.
- Duplicate: Create another block with the same content.
- Insert Before/After: Add a new block before or after the current block.
- Edit as HTML: Switches the selected block to code view where you can edit the HTML directly. Becomes “Edit Visually” allowing you to switch back to a visual editing view.
- Group: Place the block inside of a group block.
- Remove Block: Deletes the selected block from your page.

Sidebar Menu
The Settings sidebar menu includes the Page/Post settings.
When you click on a specific block, the Settings sidebar menu includes additional Block settings specific to that block.
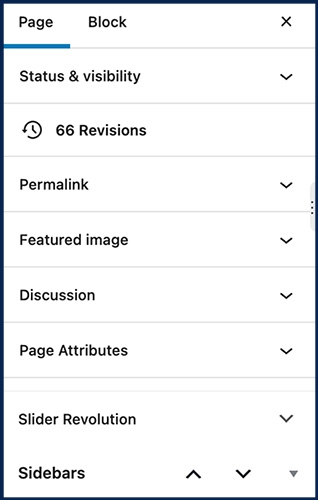
Page/Post Settings found in the sidebar menu:
Status & Visibility: Adjust visibility settings and change who can see the page or post. Here you can view when the page was published or schedule a publish date and time.
Revisions: View past versions of the page and see what edits were made for each revision.
Permalink: Here is where you find the page URL and can edit the URL slug.
Featured Image: Add a feature image to your page or post.
Page Attributes: Choose a page template or assign a parent page.
Sidebars: Change the sidebar attached to your page by selecting from a dropdown of menus created within the site.
Frequently Used Tasks
Open Existing Page
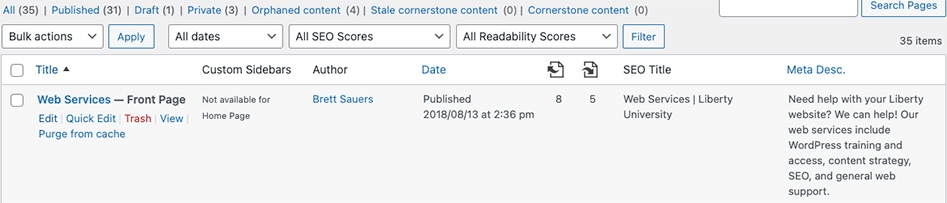
For a list of every page within your department, navigate to “Pages” from your WordPress dashboard. Here you can see every page, its title, assigned sidebars, publish date, meta description, and more. To edit what page details you see, open “screen options” in the top, right corner of the screen.
To open a page, hover over the page title and click “Edit” for the back-end editor or “View” to open the page and access the front-end editor. The front-end editor is not available if your site is running on the Block Editor.
Create a New Page
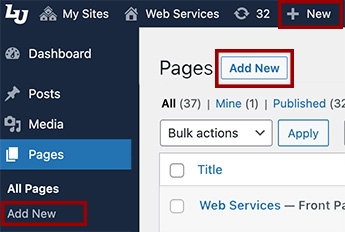
From your WordPress dashboard, there are three ways to create a new page. New pages are created in the back-end but should still be edited using the front-end editor. For help setting up a new page, reach out to a Web Content team member at webcontent@liberty.edu.
- Hover over “New” in the top menu bar and choose “Page” from the dropdown list
- Select “Add New” found under “Pages” in the left-hand sidebar menu
- Use the “Add New” button at the top of the “All Pages” screen
When your new page is ready to be published, submit your page for approval. The page will stay in pending status until reviewed by Editors (Non-Academic) or the Web Content Team (Academic). You will need to contact your Editor/Web Content and let them know your pending page is ready for review.
For more details, check out our video tutorial on Creating and Editing pages.
With every new page, be sure to complete the following:
- Give your page a title
The title is the name of the page as seen through WordPress and search engines. It will appear on page as the main heading (H1).
- Confirm the URL and edit if necessary
WordPress will automatically create a URL, or permalink, using your title. You have the ability to edit the end of the URL, also called the slug. Any changes to the slug should be made before the page is published and made live. Editing the URL of a published page can lead to broken links and web users ending up on error pages. If you need to change a URL of a live page, contact Web Content.
- Assign a sidebar
The default sidebar for your department will automatically be added to your page. You can replace the default with a different menu. If you are a Contributor, you will need to reach out to your editor (non-academic departments) or the Web Content Team (academic departments) to adjust the assigned sidebar.
- Select the parent page if there is one
If the page is to be nested under another page, you can choose a parent page. Parent pages are assigned under Page Attributes.
- Remember to save
If your new page is not complete, you can choose to save as a draft. Preexisting page should never be saved as a draft as it will remove the page from the site and cause errors for web users. When your new page is ready to be published, submit your page for approval. Non-academic sites have Editors to review submitted pages. All Academic sites are reviewed by the Web Content Team and Institutional Effectiveness.
Insert a Link (hyperlink)
- Highlight the text that will become the link – taking care not to include extra spaces at the beginning or end of the highlighted text.
- Click Insert/Edit Link from the editor toolbar

- Enter the URL (web address) of the page or file you are linking to. You can click Link Options to browse your departments pages and link to existing content.
- If you are linking to a pdf file, click on the Link Options gear and check “Open link in a new tab.”
- Click Apply/Update. The text will change to blue if the link was added successfully.
*Web Services Tip: Remember to stay away from “Click Here” links. Read our blog post about the top 3 phrases you should eliminate from your web content.
Insert an Anchor
An anchor allows you to create a link within a page that will take the user to another location on the same page (the anchor).
- Place cursor at the point the link will jump to. Click the anchor Icon

- Give the anchor a name. Your anchor ID should be simple and relevant to the anchor location.
- Highlight the text that users can click to get to anchored content.
- Click Insert/Edit Link

- In the Link Type box, insert a pound symbol followed by the anchor ID. For example: #anchoridhere
- Click Apply.
Insert a PDF
PDFs are useful for very long documents or those that must be printed. Otherwise, put the content on the page rather than in a PDF document.
- Upload your PDF to the Media Library. Learn more about your Media Library with our video tutorial.
- Use keywords to name your PDF and leave out all dates, i.e., “Theatre-audition-form”
- When naming your PDF, use hyphens between your words. Don’t use spaces, underscores, or special characters in the file name (including #, %, &, $, and most other symbols).
- Open the uploaded file and copy URL to clipboard.
- Open your page. In the editor, highlight your text – making sure to use keywords that describe your PDF document.
- Click Insert/Edit Link
- Select the gear icon to open link options.
- Paste the file address in the URL text box and check the box to “Open link in a new tab.”
- Click Apply/Update.
*Web Services Tip: Improve the value of your web pages and follow good file naming practices. Read our post about improving your file names.
Note: Converting a document to a PDF
- Open Word document, choose File > Save As. Change the File Format to PDF.
- Name and save your PDF.
Upload an Image
- Always resize and crop images before uploading them to WordPress. PDF files can be optimized for a smaller, web-friendly file size. Remember the maximum upload file size is 2MB for most university sites.
- Open your Media Library.
- Select Add New. Drag and drop your file or choose Select Files to browse your computer files.
- A message will appear to show that the file has been successfully uploaded.
*Web Services Tip: Check out our tutorial on resizing images for the web.
Insert an Image
- In the page editor, place the cursor where the image will be inserted.
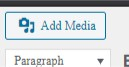
- Click Add Media.
- Upload your file or choose from the files already in your media library.
- Use the attachment details window to edit the file’s title, add alt text, and adjust display settings. Always choose to display your images at full size.
- Click Insert into page.
- Select the image to adjust alignment.
Making Professional Web Pages
Indented, Bulleted, or Numbered Text
There are buttons in WordPress for indenting, bulleting, and numbering text. Bulleted and numbered lists are particularly effective for the web, where users prefer to read little and get the information they’re looking for as fast as possible.
Images and text
To make your page look professional, wrap text around your photos and create a space between text and photo.
Select the photo. With the photo selected, the style drop-down will apply to the photo. There are options for right- or left-aligning the text, and for adding a border.
NEVER put text into image form to post on a Web page, except for the occasional banner. Text in images is unsearchable and will be ignored by search engines. Site visitors with vision impairment using assistive technologies to read the page will not be able to access text in images. An image-heavy page is slow-loading, text in image form often becomes pixilated, and it is difficult to edit.
Copying Text into WordPress
If you copy text from Microsoft Word or another program, ALWAYS use the Paste as text button. This will convert text to the default font. Using keyboard commands for pasting will give unpredictable results and you will likely end up with formatting problems on your page. (Keyboard commands are acceptable if copying/cutting and pasting within the editor.)
Writing for the Web
The website is a unique medium, and web-writing must be distinguished from print-writing.
The basic aim of writing for the web is to produce a scannable page. A Morkes/Nielsen study showed that 79% of web-users scan web pages rather than reading them.
Remember to follow our Voice and Tone guidelines and best web practices.
Producing Scannable Pages
Use headings, lists, blank spaces, tables, highlighted keywords
Any method of visually organizing information into small chunks makes it easier for users to scan and find the information they need.
Speak plainly
Cut out unnecessary adjectives. Users will not tolerate much marketing language and are looking instead for information. Avoid jargon where reasonable. Find more tips by watching our Plain Language video tutorial.
Consolidate
Web writing should have about half as many words as a print document. Again, the user isn’t on your page to read it but to scan it. Check out our video tutorial on Writing for Scanners.