Tutorial: Sizing Images for the Web
Image Sizing Tutorial
Below the two videos you’ll find a text version of the image sizing tutorial for quick reference.
Image Sizing Tutorial – Text Version
The right photo adds visual information that your text doesn’t – lets people know what your staff looks like, or lets them see students engaged in class.
Always remember that many visitors to our website will only see us through the website. Out of focus, grainy, or irrelevant photos will send a poor message about Liberty and your department!
The LU Photography department is a good resource for quality photos. They have thousands of photos and can even take photos of your special event.
After you find the perfect photo, it is equally important that it be properly prepared for use on the web. The following is a short tutorial on how to prepare your images for use on your web pages.
*Important Note: You can make an image smaller but you cannot make an image bigger. Increasing the file size (by increasing resolution or dimensions) of your image will make it pixilated and ugly!
Step 1: Open
Open the image in Photoshop. I’ll use this photo of the Hancock Welcome Center staff with Sparky, taken by University Photographer Joel Coleman, as my example.
If the Tools box is not displayed, go to Window and click on Tools.

Step 2: Crop
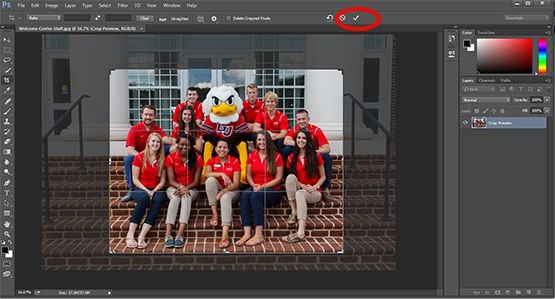
In my example, I want to crop out some of the photo that doesn’t have people in it.
- To use the Crop tool, select it from the Tools box, then click and drag to form a selection. The area outside the selection will darken to give a preview. Click on the check mark at the top of the program to accept the crop (or the “no” symbol to reject):
With the Crop tool, you can also enter a specific pixel ratio (at the top of the window).
Step 3: Image Size
Now the cropped photo looks like this:
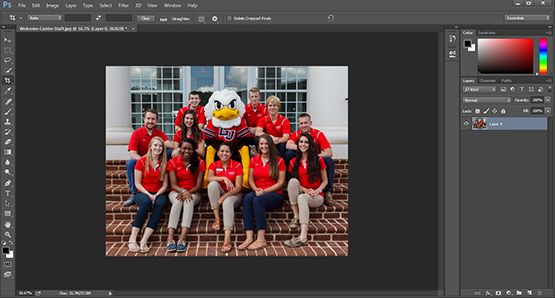
Go to Image (in top menu) and select Image Size. This will bring up a box that gives you lots of useful information about the image:
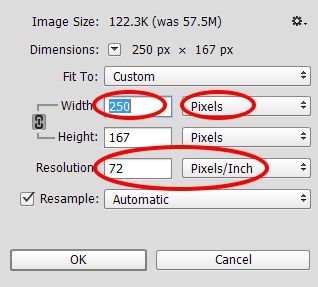
The dimensions are best viewed in pixels. Use the drop-down box to change to pixels if necessary.
Since the photo is already cropped and made into the desired shape, all we need to do is change the size. In this example, changing the width is a good idea since it’s the larger dimension.
Let’s put in 250 as the width, which will create a photo that takes about half the width of the webpage. The height automatically adjusts to keep the ratio. (If this doesn’t happen, cancel out of the window, go to Image and Image Size again, and check the “Constrain Proportions” box before you change any dimensions.) Then click OK.
Image resolution should always be set at 72 pixels/inch.
The photo got really small. To see what it looks like at 100%, use the CTRL+ and CTRL- keyboard shortcuts to make the image view bigger or smaller. The top of your image box will show at what percentage you’re currently viewing the image:

Step 4: Save for Web
There’s a special saving function that will make the image smaller than we’ve already made it and set the resolution to 72, which is what we want for web use. Go to File, and choose the Save for Web (Legacy) option. Some versions of Photoshop may have the Save for Web option listed under Export in the File menu.

A new screen opens.
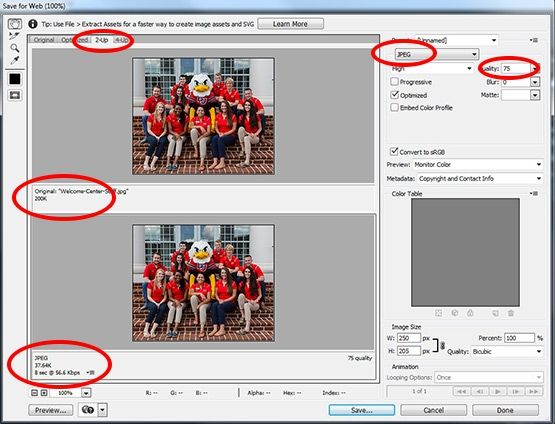
Make sure the 2-up tab is selected. The top pane shows your cropped, resized file. The file size for this example is 200K. The bottom pane shows the optimized file. The file size reads 37.64K.
At the top right, there is a dropdown box where you need to make sure JPG is chosen. There is also a box labeled Quality with a button with an arrow on it. When you click that, a slider bar comes up allowing you to change the quality. If you drag that all the way to the left, you’ll notice that the preview in the right pane gets pixilated and bad-looking. The file size also goes down. If you drag it to the right, the preview in the right pane looks perfect and the file size goes up.
Position the slider somewhere in the middle where the preview image looks as good as the image in the left pane. Then click Save. In our example, we created a file for web at 37K that looks as good as a file at 200K. The smaller the file size, the less space used on our servers, and the faster your web pages will load.
Free Tools
Check out some free tools if you do not have access to Photoshop: