Web Manager Manual
Introduction
Web Manager 2.0 (WM2) is the web content management system (CMS) used by Liberty University to create and edit web pages currently on or to be posted on websites designed and hosted by Liberty University. (Web Manager 2.0 is an updated version of Web Manager 1.)
Users must obtain proper rights and permissions in order to access Web Manager. Comments and issues related to WM2 can be communicated through the contact listed on the WM2 homepage.
Contents of Manual
Rights and Permissions
Proper rights and permissions are required in order to access WM2. Prior to initial use, the prospective user must attend training provided. A potential user must be faculty, staff, or a student worker of the University and have a valid need to access WM2. The Web Content Manager will grant permissions once the user completes the training.
By using the granted rights and permissions, users have agreed to the University Information Technology and WM2 policies and procedures. Violations of these policies may result in a removal of granted rights. The Web Content Team will monitor WM2 access and permissions changes at its discretion.
Do not share your SENSENET account to allow others to access WM2 in your place.
All Web Manager users must abide by the university’s web policy, which can be found at www.liberty.edu/webpolicy.
User Access Levels
WM2 has different access levels allowing users to perform appropriate tasks. To change, add, or remove your normal access, contact the Web Content Manager or the contact on the WM2 homepage. Publisher access must be requested by the department’s head or the current publisher through the Web Content Manager.
Normal Access
Users can edit current pages and create new pages in WM2. The pages must be submitted for approval to the WM2 publisher of the department before they go live. Users are responsible to notify the publisher of needed approval. Pages submitted for approval in academic departments are reviewed daily by the Web Content Team and/or the Provost Office. Web Content receives a daily manifest of all academic pages that are awaiting approval.
Editor Access (Academic Departments)
An editor has the same access to WM2 as a normal user, however, they will serve as the point of contact for all of the normal users, the Web Content Team, and the IT web departments. Every academic department should have one editor.
Publisher Access (Non-Academic Departments)
Generally, there should be only one publisher for each non-academic department. Publishers can edit current pages, create new pages, approve pending pages, create departmental navigation, and serve as the point person for the department regarding the Web. Publishers must review pages for content (including spelling and grammar) and layout before making them live.
WM2 Main Page
By default, the main page is the first interface the user will see after accessing WM2. The main page is used as a primary means of communication between users and WM2 Administration. The page contains a list of recently edited pages, pages pending approval, and access to the Web Content blog. The page is user-specific and will only show information relevant for that user.

- Main: Returns the user to the Web Manager main page.
- New Page: Allows the user to create a new web page.
- Open Page: Provides a list of the user’s department pages that the user has access to view, edit, or delete.
- File Manager: Allows the WM2 user to view or upload files or images that will be put on the department’s Web page(s).
- Dept. Navigation: This is useful only for web users with access to create or edit page navigations. If you have access, this will display a list of all your web department’s navigation sets. Otherwise, it will direct you back to the WM2 main page.
- Reports: Informs the user of useful WM2 information such as department users and page statistics.
- Switch to: Allows the user to switch to and from more than one Web application (if applicable).
- Log out: Logs the user out of Liberty’s portal (protects the user from unauthorized accesses).
- Edit PID: Allows the user to quickly access a page using the unique Page Identification Number (PID) assigned to that page. Entering the PID in the Edit PID box located at the top of the WM2 Main Page will immediately allow the user access to that page if the user has the editing rights.
- Web Content Blog: Access the blog managed by the Web Content Team. The blog has useful information for web writing and managing your pages.
- Recently Opened: This section displays the most recently opened PIDs. This is a quick and easy way to jump between pages when making multiple edits.
- Contact: Here you will find contact information for our WM2 expert. Should you run into any problems and need immediate assistance, don’t hesitate to contact the person listed.
- Pending Sign Off: This section alerts you to the number of pages in your department that require a Publisher review and sign-off indicating that the page is current, accurate, and useful.
- Pending Approval: This section alerts you to pages that have been submitted for approval, but have not been published. Users from non-academic departments should contact their WM2 Publisher to make the pages live. This is not necessary for academic departments, as the Web Content Team reviews these pages daily.
- My publishers: This section lists the WM2 Publishers for each department you have access to.
WM2 Features

- Page Properties: This section of the page gives information about the page. By clicking on the Edit Page Properties button, the user may add or change the current page header, navigation set, and other features.
- Left-side tool: Submit for Approval: Click after all edits are done to submit the page for approval by the department Publisher.
- Left-side tool: WYSIWYG: WYSIWYG is the tool used to create/edit page content. WYSIWYG stands for “What You See Is What You Get.” It provides numerous commands, allowing the user to fully create web pages using Microsoft Word-like menu options.
- Left-side tool: Column Break: Displays two WYSIWYG content blocks as columns (side-by-side).
- Left-side tool: RSS Feed: Inserts an RSS feed from an outside website into the page.
- Left-side tool: Preview: (Visible only when edits are pending.) Previews what the page will look like live.
- Left-side tool: View Live: Switches to the live view of the page (leaves WM2).
- Left-side tool: Duplicate: Creates an exact copy of the current page, with “DUPLICATE” after the Page Title (and a unique PID). *Change the page’s title in Page Properties after duplicating to take “duplicate” out of the title and avoid any future confusion.
- Left-side tool: Information: Gives statistics for the current page (if the page has a live version).
- Left-side tool: Left Column Content: Allows the user to develop content that will appear below the Departmental Navigation.
Do not use this function to create a Departmental Navigation pane. Navigation must be created by the department’s publisher through the Departmental Navigation function, accessible from the Page Properties section.
WYSIWYG Tools
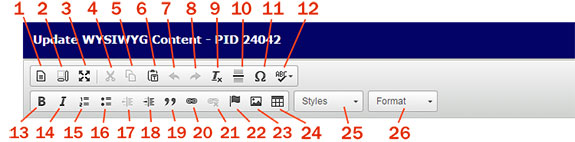
- Layout templates (not available on all sites)
- Show blocks
- Maximize
- Cut
- Copy
- Paste
- Undo previous action(s)
- Redo action(s)
- Remove Formatting
- Insert horizontal line
- Insert special character
- Spell check
- Bold text
- Italicize text
- Numbered list
- Bulleted list
- Decrease indent
- Increase indent
- Block quote
- Insert/edit link
- Remove link
- Insert anchor
- Insert image
- Insert table
- Formatting styles (such as caption, image border, and alignment)
- Paragraph format (heading styles)
Frequently Used Tasks
Open Existing Page
The user can access an existing page through one of these ways:
- Enter the Page Identification number (PID) in the Edit PID box.
- Click Open Page on the WM2 Main page and select the desired page to review.
- Or, on WM2 Main page, select a page from the list of recently opened pages.
Create a New Page
- From WM2 Main page, click New Page.
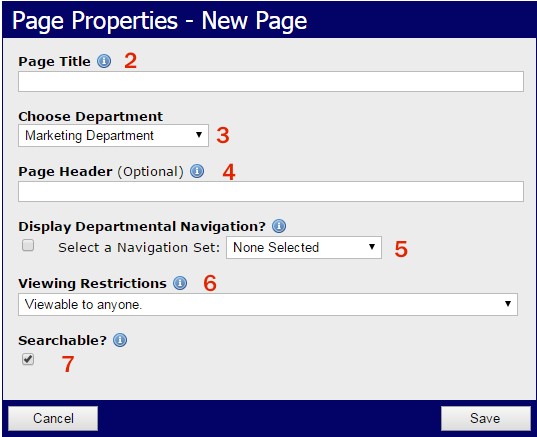
- The Page Title is the name of the page as seen through WM2.
- Choose Department – In most cases, you will only have access to one department. If, however, you have access to multiple departments, you can use this drop box to select the location of the new page you are creating.
- Page Header – Text entered here will be displayed on the page as an H1. However, this is an optional step in creating a new page. It is better to simply add an H1 later within a WYSIWYG, so feel free to leave this blank. Page Headers added here do not work on all sites.
- Display Navigation displays a navigation pane that appears on the side of all departmental web pages. This feature ensures a consistency throughout web pages under the same department for easy navigation. It is optional on each page.
- Viewing Restrictions allows you to make the page viewable to only on-campus users or users who are logged in. However, this feature does not make the page confidential.
- Searchable checkbox lists the URL of the page on online search engines such as Google or Bing. Leaving the box unchecked does not hide the page. It can still be found through an internal search on the LU webpage.
- Click Save. This will bring up the created Page in Edit Mode.
Add or Edit Content
In the page Edit Mode, choose WYSIWYG under “add content” to add a WYSIWYG content block, or click Edit WYSIWYG to make changes to an existing WYSIWYG block, and click Update when finished.
Insert a Link (hyperlink)
- In a WYSIWYG, type or select the text that will become the link. Highlight the text, taking care not to include extra spaces at the beginning or end of the highlighted text.
- Click Insert/Edit Hyperlink

- Enter the address of the page to link to or click Browse to automatically choose a page within your department or an uploaded file for your department.
- If you are linking to a pdf file, click on the Target tab, and choose “New Window” from the drop-down box.
- Click OK. The text will have changed to blue if the link was added successfully.
Insert an Anchor
- An anchor allows you to create a link within a page that will take the user to another location on the same page (the anchor).
- Place cursor at the point the link will jump to. Click the Anchor Icon

- Name the anchor.
- Highlight the text that users can click to get to anchored content.
- Click Insert/Edit Hyperlink

- In the Link Type box, choose “Link to anchor in the text” and then choose the anchor’s name in the “select an anchor by anchor name” box.
- Click OK.
Insert a PDF
- In your WYSIWYG, highlight your text – making sure to use keywords that describe your PDF document.
- Click Insert/Edit Hyperlink
- Click Browse Server (takes you to your File Manager).
- Upload your PDF or locate it if you have already uploaded it (keeping PDFs in a folder labeled “PDFs” or “Documents” helps with organization).
- Click on your PDF in File Manager.
- Click OK.
- PDF File Names:
- When naming your PDF, use hyphens between your words. Don’t use spaces, underscores, or special characters in the file name (including #, %, &, $, and most other symbols).
- Use keywords to name your PDF and leave out all dates, i.e., “Theatre-audition-form”
- Notes on PDFs:
- PDFs are useful for very long documents or those that must be printed. Otherwise, put the content on the page rather than in a PDF document.
- When your page is live, you’ll see the red PDF icon next to your link text.
Converting a document to a PDF
- Open Word document, choose File > Save As. Change the File Format to PDF.
- Name and save your PDF.
- Upload PDF to File Manager.
- Update link with the PDF.
Insert an Uploaded Image
- In WYSIWYG, place the cursor where the image will be inserted.
- Click Insert Image.

- Click Browse Server.
- Select the image from the main directory (default view) or a sub-directory.
- Click OK.
- There is also an option to upload a new image. Click Browse to select the image, then click Upload. The file will upload to the currently selected directory.
Upload and Insert an Image from File*
- Click File Manager in WM2.
- A list of uploaded departmental files will appear.
- Click Browse.
- Find the image file, click Open.
- Click Upload. The file will upload to the currently selected directory.
- Make sure that a message appears that the file has been successfully uploaded.
- In WYSIWYG, click Insert Image
- Select the image from the main directory (default view) or a sub-directory.
- Click OK.
*An image file must be less than 150K in size. JPG is the recommended file type. Do not edit images in WM2. Use other manipulation software to reduce and manipulate images. Liberty University recommends Adobe Photoshop.
Insert a Table
- In WYSIWYG, click Insert/Edit Table icon

- Indicate the number of desired columns and rows.
- Set the size of the table using percentages or pixels. (100% is the default width.)
- Leaving Border Size at “0” will make the borders invisible (a light grey line will indicate the table borders in WM2 but they will be invisible in the Preview and Live modes), greater numbers will make the borders visible and with the size indicated.
- Cell Padding is the space between a cell border and the object within it.
- Click OK.
- The user can freely add and edit content in the created table.
- Table or Cell Properties can be edited by right-clicking on the table in WYSIWYG.
Additional Information
Editing photos/images
All images used on web pages must be optimized for the web before they are uploaded to Web Manager. Pages with large images will load slowly. To optimize photos and images, use Photoshop. A tutorial for optimizing images can be found on the Web Content blog.
WYSIWYG Object Edit
Objects such as tables, images, and cells can be edited by right-clicking on the object in WYSIWYG and selecting the appropriate option.
Making Professional Web Pages
Indented, Bulleted, or Numbered Text
There are buttons in WM2 for indenting, bulleting, and numbering text. Bulleted and numbered lists are particularly effective for the Web, where users prefer to read little and get the information they’re looking for as fast as possible.
Images and text
To make your page look professional, wrap text around your photos and create a space between text and photo.
Select the photo. With the photo selected, the style drop-down will apply to the photo. There are options for right- or left-aligning the text, and for adding a border.
NEVER put text into image form to post on a Web page, except for the occasional banner. Text in images is unsearchable and will be ignored by search engines. Site visitors with vision impairment using assistive technologies to read the page will not be able to access text in images. An image-heavy page is slow-loading, text in image form often becomes pixilated, and it is difficult to edit.
Copying Text into WM2
If you copy text from Microsoft Word or another program, ALWAYS use the Paste button to paste. This will convert text to the default font. Using keyboard commands for pasting will give unpredictable results and you will likely end up with formatting problems on your page. (Keyboard commands are acceptable if copying/cutting and pasting within the WYSIWYG.)
Writing for the Web
The website is a unique medium, and web-writing must be distinguished from print-writing.
The basic aim of writing for the web is to produce a scannable page. A Morkes/Nielsen study showed that 79% of web-users scan web pages rather than reading them.
Use the following basic guidelines to produce scannable pages:
Use headings, lists, blank spaces, tables, highlighted keywords
Any method of visually organizing information into small chunks makes it easier for users to scan and find the information they need.
Speak plainly
Cut out unnecessary adjectives. Users will not tolerate much marketing language and are looking instead for information. Avoid jargon where reasonable.
Consolidate
Web writing should have about half as many words as a print document. Again, the user isn’t on your page to read it but to scan it.